
 Not every week or every day can be full of success stories, and this was one humbling week! In this profession I have been told numerous times that once you gain confidence you will immediately be put back in your place. There is so much that can go wrong in a recipe including natural factors like humidity and weather. It really amazes me that the difference of a few seconds can make something turn out right or wrong. It started with a rather unappetizing creme caramel, shown above. It came out of the oven too soon so it was under baked, also the caramel was too light. The caramel is an example of how a few seconds can make the difference because sugar begins to caramelize very quickly and once it is removed from the oven it continues to darken. If it is removed a few seconds too early, it is too light, but if it is removed too late, it will be a sticky, smelly burned mess!
 Although these Classic Nepolians were edible and quite tasty by several accounts (I didn't try it). The main issue with this one was my strategy in assembly--not a good one... The photo collage shows (clockwise) the puff pastry dough before going into the oven, assembling the layers, layers before glazing the top, finished and ready to eat! To make sure that this really was a humbling week I am going to share all of my mistakes! First, I layered the diplomat creme filling on the middle layer of puff pastry before I laminated it to the bottom. This made it impossible to pick up without breaking it into several pieces. Then, after all three layers were laminated together I realized that I hadn't glazed to top, which was supposed to be done first so it had sufficient time to set.
 This week I made cheese filled crepes with blueberry coulis as a plated dessert. This was my first experience making crepes and I learned you have to work fast to get them to be thin. Although these were delicious and a good dessert there were not many options for plating. Two crepes were plenty for one serving, although I had originally planned on using three. Also, I had candied lime zest to use as the green garnish in place of the mint, but it lost its color and looked rather putrid! Although I don't like using mint as a generic garnish for color it does work in this instance so I bite my lip!
This is a cinnamon creme brulee with dried fruit compote. Here again I accept defeat--I should have infused the cream with more cinnamon. The flavor was quite bland since I omitted the vanilla bean and hoped that the cinnamon would take its place. Also, the top was not burned off very well and could have been much darker.
 There are an amazing variety of things that can be made with pate a choux dough, typically used for eclairs and sometimes called eclair paste. Pictured above are paris breast (round), pate a choux swans and petite eclairs. I filled these all with the same moussaline filling, which is pastry cream with whipped cream folded into it. The fillings vary, but are typically either whipped cream, pastry cream or moussaline.
 The word petit four translates to "little oven." I have to admit that that really doesn't make much sense to me, I would have named them little cakes has they asked, but they didn't! The petit fours above were three layers of a dobos sponge, which has almond paste in the recipe giving it a very fine crumb, important in such a small cake. The cake is layered with strawberry jam, the top is a fine layer of marzipan and then the entire cake is coated in boiled fondant, which I poured on. These little cakes are very sweet, but that's okay when it is only two bites!
 There are an amazing variety of things that can be made with pate a choux dough, typically used for eclairs and sometimes called eclair paste. Pictured above are paris breast (round), pate a choux swans and petite eclairs. I filled these all with the same moussaline filling, which is pastry cream with whipped cream folded into it. The fillings vary, but are typically either whipped cream, pastry cream or moussaline.
 The word petit four translates to "little oven." I have to admit that that really doesn't make much sense to me, I would have named them little cakes has they asked, but they didn't! The petit fours above were three layers of a dobos sponge, which has almond paste in the recipe giving it a very fine crumb, important in such a small cake. The cake is layered with strawberry jam, the top is a fine layer of marzipan and then the entire cake is coated in boiled fondant, which I poured on. These little cakes are very sweet, but that's okay when it is only two bites!


 I also plated one larger Vanilla Panna Cotta which I thought turned out successfully because it looks naturally placed and is simple in presentation.


 This was the second week of my plated desserts class. We started the week with a day of production, which usually is making stock items for the bakery such as lemon curd, dough crust, ganache and pastry cream. When all of that work is done or when nothing is needed, we make individual sized pastries such as cookies, tartlets and mini eclairs. Taking advantage of a fully stocked bake shop I made lime curd tartlets with a meringue hat!
 I also made these chocolate cups by painting the insides of muffin papers. The chocolate cups were then filled with a Passion Fruit Bavarian Cream, the recipe from my new

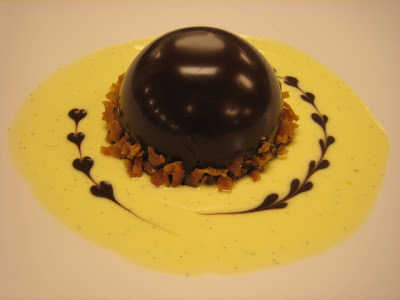
 This plating was an attempt to use an additional garnish, yet still keeping it simple as well as using a different size plate. Here the additions are the chocolate cigarettes placed in the whipped cream. This worked for me because the cigarettes were placed in the whipped cream. I have a serious aesthetic problem with placing garnishes directly into a molded creme like this pot de creme, so the whipped cream worked as a platform where I could place the garnish. I have found that these molded creams, creme brulee included, are the most difficult to garnish and serve in a nice presentation.



 Currant Scones. These were okay, but you can see that they are rather flat, and didn't rise like other scone recipes I have made in the past (see cranberry scone post in November). Also, they were too sweet, almost more like cake than scones.


 These are Palmiers, which are a piece of puff pastry rolled with sugar or cinnamon sugar that is then folded, sliced and baked so that the sugar caramelizes. An amazing cookie and my vote for the best use of puff pastry.


 The cibatta made wonderful grilled sandwiches. This one was steak and blue cheese--I am nostalgic just remembering how good it was.
 Pane di Como, a white bread that was made with biga, a pre-ferment from Italy.


 On of the most decadent projects were our sticky buns! A rich buttery dough filled with sugar, cinnamon, raisins and pecans! Really sweet, but as a carb-a-holic I couldn't stop eating them! In the past I have always made them in individual muffin tins, but I liked baking them all together in a cake pan so that they pulled apart from each other and shared the sugary glaze.


 The last project of the week was pizza! Our chef instructor called it "student appreciation day" as we all made 2-3 pizzas and ate them for lunch! Considering the quality of the cafeteria food we are served (terrible!) we were really excited about today's lunch! Above are two pieces of my cheese pizza. We were required to make one with cheese only and the other pizzas could be topped as we liked. I am typically not a huge fan of cheese only, but the quality of the dough and sauce were so good that no other toppings were needed!
 The end of the week we moved to the Levain production station. Levain is a bread that uses a natural leavener in the place of yeast. The natural leavener is a starter, which was initially made by Peter Reinhart, the author of